Saturday 30 November 2013

Tuesday and Wednesday's pasties

Due to another mistake (on my part) with the internet shopping we had ended up with a rather large quantity of onions. I had meant to get some white/brown onions and some red onions but had inadvertently ordered all white/brown. With a busy few weeks ahead there are going to be limited opportunities for using these conventionally so I was in need of a bulk onion operation. The obvious would be onion soup but we have been eating soup (leek/potato/lentil or pumpkin/sherry) most days of the past week so I was looking for something a bit different. What came to mind was some kind of onion tart. This would have the bonus of providing me with an opportunity to practise my pastry skills.


Whilst perusing for a recipe I came across a few possibles for a tart but was distracted by one for pasties. After consulting with Matt, my husband, I decided to go for the pasties. One of the main purposes of this baking would be to contribute to a train picnic so pasties were imminently more sensible than tarts.

I started off making the pastry. The recipe I had was for onion and Wensleydale pasties. I didn't plan to do onion and Wensleydale, I planned to invent my own filling, but the pastry would be universal. On this occasion I was going to attempt flaky pastry. I was somewhat overwhelmed by the long long list of instructions (14 steps) but on closer inspection these didn't seem too awful, just detailed. I was also somewhat overwhelmed by the amount of butter called for (175g), but I suppose that is what happens when you decide to make pastry. The recipe said that you have to divide this into 4 even parts, which gives the puzzling mass of 4 x 43.75g. I am yet to discover the kitchen scales that measure to two decimal places but I did a pretty good job and got them all within 2g with just a tiny bit of adjustment.

You rub the first (near) quarter of butter into the flour and then mix it to a dough with cold water and a teaspoon of lemon juice. I am not sure of the role of the lemon juice but this was the first time I'd made this so I wasn't about go fiddling with the recipe. Then you knead it and chill it. This recipe called for a lot of chilling which makes it a good multi-tasking option (laundry in this instance). Once chilled, you roll out the pastry. The recipe specifically stated that it should be rolled out to a 15x45cm rectangle. I was not about to be getting my tape measure out so sort of estimated this too. I also found that it was very difficult to get a rectangle shape and ended up with more of an oval really.

The next step was described as flaking the next (near) quarter of butter over the bottom and middle third of the rectangle. I assumed it meant that you had the 15cm horizontally and the 45cm vertically (which was actually the opposite arrangement to my pastry). “Flaking” the butter seemed like a rather complex operation, certainly not one I could achieve before the butter melted in my hand, so I grated it instead. I used one of those little graters that you get in hot chocolate gift packs at Christmas time which was surprisingly satisfying. You then fold the pastry up like an envelope and chill it again. Once chilled, you repeat all of that with the third (near) quarter of butter; and then again with the final (near) quarter. Incidentally, it got easier to roll to a rectangle with each stage, but still not perfect.


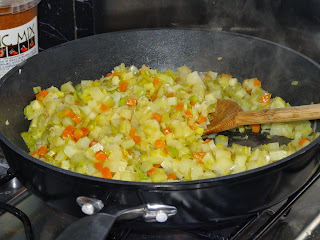
By now it was getting late and, having been busy multi-tasking, I had neglected to make the filling. I decided that it would be wise to go to sleep and do that the next day. Having originally planned this project to use a load of onions but when it came to it I had a change of heart. I made a more generic vegetabley filling with onion (x1), celery (x1 stick), carrot (x1), leek (x2) and plenty of seasoning. I sautéed this all off on the hob, by which time I needed to get off to work, so the pasty assembly would have to wait until later.

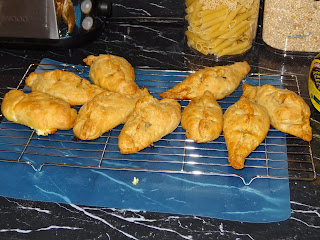
I rolled out the pastry for the final time and then cut it into nine square(ish) pieces (the recipe said eight but nine seemed to fit better). I dolloped a bit of the vegetable filling onto the squares and then augmented with some cheese, we had some feta and my favourite brand of soft cheese with garlic and herbs to use up so I did 4 with the former and 5 with the latter. It became apparent that I had made far too much filling and I didn't manage to use up either of the cheeses either. The closure of the pasties proved the most technically demanding part of the process so far. I managed it but not in a very neat manner. These would be rustic looking pasties.
The recipe then told me to “flake the pastry with a knife”. I had no idea what this meant so sort of scraped one of the pasties but this just looked weird so I didn't do anything to the rest of them apart from snipping to let out steam.

They go went into a very hot oven for 8 minutes and then had further 20 minutes or so slightly cooler. I had a peek midway and was appalled at the volume of fat they appeared to be swimming in so did a careful pour away of some of this. I took them out of the oven when they looked golden. As it was now past 10 o'clock the taste test would have to wait until the next day.


In the morning I started the preparation for our train picnic. This involved putting 2 pasties each (1 each of the soft cheese with garlic and herbs and feta) into a plastic tub. This left 5 pasties for me to distribute at work. 5 is a difficult number to distribute because it's clearly not enough for everyone. My criteria today were:
1. Pregnant people
2. People who got wind of the pasty situation and asked for one
3. People who were extra-specially nice.

My pregnant colleagues devoured one each for elevenses; I devoured one for a mid-afternoon snack – I couldn't resist as every time I opened my bag I got a whiff of pasty goodness; and I gave the final one to the colleague I had been working closest with that day. The consensus was good. Indeed someone actually declared me to be a cooking wizard!

I had to rapidly augment our train picnic due to the quick post-work turn around time to get the train. I added baps (cheese and tomato plus feta and guacamole), yoghurt, crisps and malt loaf (pre-sliced). The pasties were definitely the highlight (although the feat and guacamole bap came a close second). The pastry was crisp and the filling delicious. My pastry confidence has improved and I plan to reprise the pasty creation for a wider audience.


(In case you were wondering, Matt ate the excess filling with a fried egg late at night.)

Sunday 24 November 2013

Sunday's scones

Having eaten a huge amount of bread yesterday (in the form of both bread and homemade pizza) I decided that we needed to ease off a bit. But we have a lot of soup to eat (made last weekend and I stupidly didn't make sure that there was space to freeze some before doing so – there wasn't) and while soup on its own for one meal in a day is just fine, for two meals in a day it isn't. We had a bowl of leek, potato and lentil each for lunch so I was thinking that it might be jacket potato time for tea.

But that all changed this afternoon with a trip to a local historic house. We didn't plan to go to the house (and actually we didn't), just have a walk around the estate to see the Autumn colours and top-up in the café. As it happened we also encountered the “Christmas Festival” (which explained the long queues and unusual one-way system), in which we didn't get anything Christmas-sy but did come out with two rather lovely clocks. This is what Matt and I have been intending to buy with some money kindly given to us by my aunt and uncle for our wedding, and now (only a little over 5 years later) we finally found the perfect items.

But I digress. Due to the "festival", the café top-up happened before the walk. This is obviously the wrong way round but I didn't want to risk café closure before we had got round – I'm dawdling even more than usual at the mo. We were quite good and shared a piece of chocolate caramel shortbread but I was very tempted by a cheese scone. What swung it was that I decided I could make a cheese scone a lot easily than the sweeter option. The chocolate caramel shortbread was delicious but all around the walk I was thinking about cheese scone. So, jacket potatoes were off and soup with cheese scone was on.
 
I wanted to try a different recipe to that which I have done previously and pulled out one for “spicy cheese scones” for my box. This called for caraway seeds, which I don't have (I think I really like them) but the basic recipe looked achievable. I had a slight moment of panic when I realised that I needed to add some cream of tartar as I didn't think I had any of that either (I'm intrigued as to what this actually is) but found an unopened tub in the baking cupboard. I mixed the dry ingredients together as instructed but also added ¼ of a teaspoon of mustard powder. This was as well as the listed cayenne pepper but it's so rare that I get an opportunity to use mustard powder and I accidentally have two nearly whole tins that I didn't want to pass on this rare chance.

 
Instead of using my fingers to rub the butter into the dry ingredients I used the food processor which is probably a good idea when cayenne pepper is involved. At least it was a good idea once I had spent a few moments befuddled before realising that I had missed a crucial component from the food processor assembly. Then you stir in the cheese. The recipe said 75g. I measured 85g before grating – you can never grate the last little bit that you're holding so you need to eat that, which accounts for the extra 10g. I have given up buying anything except the most mature cheddar I can find on special offer and I was hoping this would make the scones satisfyingly cheesy.
 

It was at the cheese stirring in stage that I thought that the butter might not have been properly incorporated into the dry ingredients. But it was too late to do anything about that now so I just carried on: stirring in an egg and about 150ml of milk. It would have been wise to not add all the milk at once but hindsight is a wonderful and the dough seemed only a little bit too soggy. But it was too soggy to be able to roll and cut so, rather than make individual scones, I sort of patted it out into two giant ones (a baking tray each). I scored them to mark approximate quarters and put them in the pre-heated oven at the hottest temperature possible (apparently that's a trick with scones). The baking time for individual scones was stated as 8 minutes so I gave these big ones ten – after which they were smelling amazing and looking tempting.


While they cooled I had just enough time to reheat us a bowl of spiced pumpkin and sherry soup each. I made the mistake of cutting the scones initially (this damages the texture), but quickly realised that they should actually be torn apart. The amazing smell and tempting look was justified – perhaps the best cheese scone I have ever eaten (apart from in a hospital canteen in Oxford - seriously, they were amazing). The inside was really light and the outside had just the right sort of crunch about it. Matt's description was "munchifiable in the extreme" - these will be making a repeat appearance!
(Oh, and the soup wasn't bad either.)

Saturday 16 November 2013

Tuesday's couscous gratin

Having been away for the weekend, and not yet having had the opportunity to go shopping, the food storage areas were looking rather sparse. Matt, my husband, had picked up a few essentials for Monday's pizza (mushrooms) and we had acquired a large number of leeks and apples, plus a couple of enormous wedges of pumpkin from various friends and relations but other than that the range was slightly limited. On further inspection I found a butternut squash that I had bought a few weeks previously, some aged and wrinkly cherry tomatoes and some aged and wrinkly peppers (partially deployed on Monday's pizza).

Mum, who was staying (along with dad), for a few days suggested roasted veggies with halloumi cheese (Matt ensures that we always have halloumi in the fridge since a barbeque incident a few years ago when the shops were all sold out) but this seemed a bit of a cop out that I serve to them frequently. I decided that the squash and the leeks would form the basis of the dinner since we had the most significant quantity of these. I still wasn't sure exactly what I was going to cook, we might be looking at risotto or something baked in the oven, but started off by putting the butternut squash (whole) in to pre-roast. This bought me some time, during which I decided the oven option would be preferable and I imagined up what I wanted to created. This was some sort of gratin, but rather than using breadcrumbs I would make a big couscous topping (that is a big topping based on couscous, rather than a topping made with big couscous – which we discovered does exist!).

I got one of the giant leeks and cleansed and chopped this (the squash was still roasting). Once I deemed that the squash had had enough time (skin going a bit black and wrinkly) I extracted it from the oven and, once it had cooled sufficiently to allow handling, peeled and chopped this too. In actual fact I only peeled and chopped half of it – I'm always amazed at just how far an apparently moderate butternut squash will go. I arranged the chopped veggies in a large oven proof dish. It was looking slightly dull and since I had those half used wrinkly peppers I sliced those thinly and scattered those over. Not wanting to risk under cooked veggies I put it all back in a hottish oven to roast a bit more before adding the topping.


It struck me that the whole thing was at risk of being rather low in protein, mum suggested adding sweetcorn (which I don't really think is a high protein food), but I decided on butter beans and tipped a (drained) can of these on top of the veggies. In order to evenly distribute these I ruined my beautiful arrangement of veggies and swooshed everything around in the dish. The ruining of the arrangement was not really too much of a problem as it was all going to get covered with the couscous topping. I covered the veggies and beans with a thin (but complete) layer of (raw) couscous dotted in a few lumps of garlic and herb soft cheese (left over from the pizza) and poured about a pint of hot vegetable stock over the top of it all. I sealed it up with some kitchen foil and returned it to the hottish oven.

This might seem like an unusual way to cook couscous, but I can assure that it works – a sort of steaming. The usual couscous rule applies of using about the same amount of water as couscous by weight, but in this scenario be mindful that the veggies / beans will soak up some of the fluid. So after about 20 minutes I extracted the oven proof dish and removed the tin foil, the couscous looked nearly done but for good measure I added a little bit more fluid and topped the whole thing off with the wrinkly cherry tomatoes that my mum had fettled up. Back in the oven (uncovered this time) for another 10 minutes (until the tomatoes look even more wrinkly and there are a few crispy bits around the edges and it was ready to eat.


It tasted really nice, a good mixture of flavours and textures. Dad even went back for seconds which, for dad, is most unusual. And pleasingly it only used one cooking dish. Really it should have been served with a nice green salad, or maybe some sort of green vegetable but we had only a few leaves left over from the previous day's pizza dinner which mum and I polished off afterwards. And mum pointed out that it might have benefited from some sort of extra sauce. I've been thinking about this and maybe a sort of fruity sauce along the lines of redcurrant would be nice. But that would rely on you having redcurrants available. It turned out to another good dish to reheat for the next day's lunch, maybe even tasting better once the flavours have had a chance to “mature” a little bit.

(In case you're interested butter beans have over twice as much protein per 100g as sweetcorn. My favourite yeast extract has 6.6 times more protein per 100g than butter beans but I'm not sure that I could manage 100g in one sitting and it wouldn't have been very nice in the dinner.)

Tuesday 5 November 2013

Sunday's fish cakes

Still on a mission to use up an excess of smoked fish and with some leftover mashed potato from Saturday's dinner I decided to make some fish cakes. I don't really know much about making fish cakes but I do know quite a bit about eating them so I would rely on this for their creation.

We had one leek lingering in the fridge and I thought that this would go nicely, so I started off by chopping this up and frying it. I wasn't really sure about the quantities but had about one (hungry) person's worth of potato left and didn't want to overload this with too many other ingredients for fear of it all falling apart. I stirred the now fried leeks into the potato and it still looked safe.

I had been quite organised with the fish and had got it out earlier to defrost – using my favourite method of immersing it in a washing up bowl of warm water. (The fish was still in it's freezer packaging). I wanted to pre-cook this too and opted for the easiest option modern technology provides: the microwave. Now, I know some people “don't believe” in microwaves (as if they were some sort of faith related issue), but I for one am a big fan. There are a few features of our microwave of which I am a particular fan, one of these is the auto-fish-cook feature. You just enter how much the fish weighs and it automatically triggers the time and power for perfectly cooked fish. So after 3 minutes and 20 seconds my smoked fish was done. I removed it from the skin, flaked it and mixed it through the potato and leek. The proportions still looked safe, but I was concerned about the overall binding so, once there'd been enough time for the fish to cool down, I stirred through a beaten egg.
 

The transformation from random mush to proper the fish cakes was quite satisfying. I took about a fistful of mixture rolled it around in my (clean) hands and then patted it out into a fish cake shape whilst covering in breadcrumbs – another use for the mammoth quantity we have in the freezer. Thus far what I had created was looking remarkably fish cake like.

One of the things that worries me is raw egg. All the other ingredients in the fish cakes were pre-cooked but I wasn't sure how I should proceed to ensure that the egg was fully cooked through. After much deliberation I decided that the best course of action would be to shallow fry them for a few minutes to seal and make the breadcrumbs go brown and crispy, and then cook in the oven for 10 minutes or so which I estimated would be enough time for the egg to cook and for everything to heat up nicely. I was a bit nervous about the frying pan phase in case the fish cakes fell apart during manipulation, but it was ok.


While the fish cakes were in the oven I prepared some carrots to go with them. I did them in a way that should usually be reserved for special occasions. I cut the carrots into thin strips and then cooked them in a pan with equal volumes of butter (probably about 40g but I didn't weigh it) and water. I also added a tablespoon of ginger syrup. By the time the carrots are soft you're just left with a lovely bit of buttery sauce. And I microwaved some peas as well.

There were six fish cakes altogether, which between two of us might have been excessive but we were hungry (well I was anyway, I had had a busy day of doing not very much). I had my fish cakes with tomato ketchup (another of my five a day) and Matt had his with garlic mayonnaise. They were really yummy and we were both pleased to have three to enjoy. Matt went as far as to describe them as “restaurant quality – much better than some fish cakes that I've eaten in some restaurants, so better than some restaurant's quality”. The carrots weren't bad either (and the peas were peas).

Sunday 3 November 2013

Saturday's toffee apple tart

It being somewhere in the vicinity of Halloween and bonfire night I was thinking about toffee apples. I'm not really sure which festival (if you can refer to these dates as festivals) they are actually associated and I don't really like toffee apples but the flavour combination is something to work on. We had visitors due so it was a good excuse for a pudding. I envisaged a toffee apple tart. Unfortunately none of my recipe books nor cuttings envisaged a toffee apple tart so I would have to make it up.
 

I started off with some pastry. I am not a pastry expert – this can be put down to either:
  1. not inheriting my granny's excellent pastry making skills
  2. not enough practice
     
In the absence of any pastry direction I decided to just go with plain shortcrust – I thought that the filling would probably turn out sweet enough and sugared pastry would be excessive. So I found the most basic shortcrust pastry recipe I could and made that. I used the food processor for most of it which sped things up rather than the conventional technique of rubbing the butter into the flour with your fingers. It seemed to turn out ok and I rolled it out quite thinly into a sort of circular shape using my own devised method of placing it between two thin plastic chopping boards. This prevents the pastry from sticking to the rolling pin and prevents the rolling pin from getting to messy (or if you haven't washed the rolling pin up from another project you can still use it).


I could see my first potential problem being that of insufficient pastry. That would be because I just made the amount of pastry stated in the recipe rather than an amount specific to my tart dish. What I should have done was to get a smaller tart dish out but they are rather precariously arranged in a cupboard and I had already committed myself to this particular one. As I transferred the pastry into my selected tart dish my second potential problem (not unrelated to the first) became apparent: because I had rolled out the pastry so thinly it broke in a few places. The brittleness may also be put down to my non-pastry expert skills (see above). I did a bit of repair job and managed to end up with something that looked like a raw pastry case.


While the pastry case was chilling in the fridge I started work on the toffee apple filling. This would be entirely made up. I peeled and chopped 6 smaller (cox) and 2 larger (gala) eating apples taking particular care to remove the bits from around the core that are like finger nails (I never like finding those in puddings). Maybe cooking apples would have been more appropriate but I didn't have any. I put these in a frying pan along with a load of butter and a load of soft brown sugar. This is one of those creations where you don't really want to think about just how much sugar and butter goes into it. I didn't weigh but it probably amounted to about 150g of each. Then I added a little bit of lemon juice (to stop the apples going brown) and put the whole lot on a gentle heat on the hob.

It was now time to blind bake the pastry case. I pricked the bottom, lined it with greaseproof paper and filled it with baking beans (the first use of a set I acquired from my mum who was getting rid of them when she had her kitchen done, she doesn't do a lot of pastry either) and put it in the oven at 200°C for 20 minutes, removed the baking beads and then baked for another 5 minutes. The times were a bit of guess work, but it seemed to come out ok apart from a few cracks. There was nothing I could do about that now but hopefully I would have avoided a soggy bottom.

The filling was coming on. The butter and sugar had combined into a liquid that was bubbling away and I just kept moving the apples around in this syrup. I must admit that I was slightly worried about just how liquidy it was looking so I put in an emergency call to my mum. She was out so, since she has yet to fully embrace the benefits of mobile technology, I would just have to carry on and hope it turned out ok. I might have added a bit more sugar but I had run out, that would probably have been futile anyway since sugar is not renowned for its thickening properties. I could have added some corn flour, but based on previous corn flour addition disasters that was a risk I wasn't prepared to take. So I just carried on and hoped for the best.


That turned out to be the right decision as eventually the liquid turned more syrupy and then more toffee-y and the apples took on more of a caramel hue. I took my cue to turn the heat off when it was just about starting to burn in places. But this was a good sort of burn – it smelt amazing.

All the above was done before our visitors arrived so all that was left to do was to assemble and finish off cooking when it was pudding time. (Which was a good job as we had all had a rather exciting and tiring day out at a local “tourist farm”. http://www.pennywellfarm.co.uk/) I had actually got a little bit of pastry left over and made a few bits of lattice and an apple to shape to go on top of the tart. This is advanced for me but unlikely to win any prizes in the decoration stakes. It baked at 180°C for about another 20 minutes (which just about gave enough time for our toad-in-the-hole and mashed potato to go down).


Matt, my husband, volunteered to do the honours of serving. I would like to say that it was this that resulted in the ensuing mess but much more likely it was the fact that the pastry was so fragile. Still, we managed to serve decent looking pieces to our visitors and we had the more mangled looking portions (all served with a little bit of vanilla ice-cream). But I must say the appearance paled into insignificance with the first mouthful. It was absolutely scrumptious. I just need to work on the architectural aspect of my pastry (it tasted good) and we're going to have a truly special pudding in our mouths.
 

Friday's early morning blackcurrants

In normal circumstances I am not an early riser (I'm more of an average riser), but I've been having problems with pain waking me up so rather than stay in bed and be annoyed about not being asleep I decided to get up and do something productive. And that something productive would be some baking. I had acquired some more blackcurrants from one of my colleagues and we had all had a rather fraught week at work so some Friday treats featuring these would be in order.
 
The thing that I really wanted to do with these blackcurrants was a cheesecake, but this would not be suitable for work place snacking, and it would probably be a bit ambitious for these unaccustomed early hours. Instead I would make some muffins, blackcurrant with some sort of cheesecake feature. This should theoretically be a simple combination of summer fruit muffins and chocolate cheesecake muffins – without the chocolate. The concept of blackcurrant and chocolate appeals to me but I wasn't sure that it would universally popular.
 
The most annoying part of the process was preparing the blackcurrants, getting rid of all the little woody bits from the ends of them. From my previous experience of dealing with blackcurrants I didn't even bother trying to do this with a knife and went straight to plucking with my (clean) fingers. The recipe called for 140g and I had about 300g so I just needed about half of them. To prepare this many took about 20 minutes which is ridiculous when you see how few it actually amounts to.
 
The trick with muffins, I have been led to believe, is to keep the wet and dry ingredients separate until it's time for them to be baked. So before getting on with the main muffin part I did the cheesecake part so that the final assembly could go ahead quickly when the time came. I mixed 110g of soft cheese and 45g of caster sugar which would be distributed to make a filling. Then I mixed the dry ingredients: 280g self-raising flour, 1tsp baking powder and 100g caster sugar. This was less sugar than the recipe called for but I anticipated that the filling would add sweetness and I don't like things too sweet anyway. The wet ingredients consisted of 240ml milk, 90ml vegetable oil and an egg, all beaten together.
 
 
I prepared the muffin tins (although I had to use cupcake cases as I have somehow run out of muffin cases which was a bit annoying as the fit wasn't quite right) and then poured the wet ingredients into the dry. The other trick with muffins, I have been led to believe, is not to over mix – the mixture should be quite runny and a bit lumpy. Finally I quickly stirred through the blackcurrants. I was a bit worried that they would all sink to the bottom when the muffins were baked but there was nothing I could do about that. I quickly filled each case with a tablespoon of muffin mixture, followed by a teaspoon of cheesecake filling mixture, topped with another teaspoon or so of muffin mixture.
 
They baked at 190°C for about 25minutes. The cheesecake filling prevents an accurate skewer test but I'm pretty confident with muffins and they can be relied upon to be done once they look a bit golden. Some of the cheesecake filling had oozed out but to me this looked rather appealing.
 
I packed up enough for one each at work plus some spare for anyone with a big appetite (we all know who!) – leaving a few for Matt and his mum, who was coming round for tea. What I had failed to appreciate was that to top our fraught week off 2 people were on leave, which (when combined with sickness) meant that at 4 people we were down to 50% power. So there were plenty of muffins to go round. Clearly they had some magic in them as we had a remarkably non-fraught day.
 
Maybe I should try this early morning baking more often, and maybe I should try the chocolate / blackcurrant combination with the blackcurrants I've got left.
 
(And in case you were wondering the blackcurrants didn't sink.)